What is a Deed of Assignment?
I took my time to research more concerning deed of assignment, After much research i came across this from omonile lawyers, i bet you majority of land buyers today don't collect this documents after purchasing plot(s) of land.
A deed of Assignment is one of the most important documents YOU MUST HAVE when you conclude a Land Transaction. In fact it baffles me that 6 out of 10 people I know who have bought lands in the past have no deed of assignment. They are always the first to complain that Omonile has defrauded them but they have no proof to show the property has been sold to them other than a receipt.
It’s funny that everyone has the title documents to their car showing who the seller was and how it was transferred from the Seller of that car to you the new owner but when it comes to landed properties which are 10 times more valuable than cars, we fail to ask for this one simple important document that can prove ownership of that land. What then is this all important deed of Assignment I am alluding to? This can be found from the following definitions below:
A deed of Assignment is an Agreement between the Seller of a Land or Property and a Buyer of that Land or property showing evidence that the Seller has transferred all his rights, his title, his interest and ownership of that land to that the Seller that has just bought land.
The Deed of Assignment acts a main document between the buyer and seller to show proof of ownership in favour of the seller. The person or Seller who transfers his rights or interests in that property is usually called the Assignor and the person who receives such right or interest from the Seller is called the Assignee.
A Deed of Assignment therefore is an Agreement where an assignor states his promise that from the date of the assignment or any date stipulated therein, the assignor assigns his ownership in that Land to the assignee. The deed contains very pertinent information for a real estate transaction. For one, it spells out the date when the ownership of the property transfers from one owner to the other. The deed also gives a specific description of the property that is included in the transfer of ownership.
In most situations, when the Deed of Assignment has been exchanged between both parties, it has to be recorded in the land registry to show legal proof that the land has exchanged hands and the public should be aware of the transaction. Such recorded Deed of Assignment come in the form of either a Governor’s consent or registered conveyance. The Deed of Assignment spells out the key issues in the transaction between the Seller and the Buyer so that there won’t be any confusion or assumption after the property has been transferred to the new owner. Such Key issues include:

Signing a Deed of Assignment and having that Deed is your number 1 evidence against another person that is trying to claim ownership of that same land too. If you have a land and no deed yet, i feel sorry for you! Better consult your Lawyer to go draft one for you now to save yourself future problems
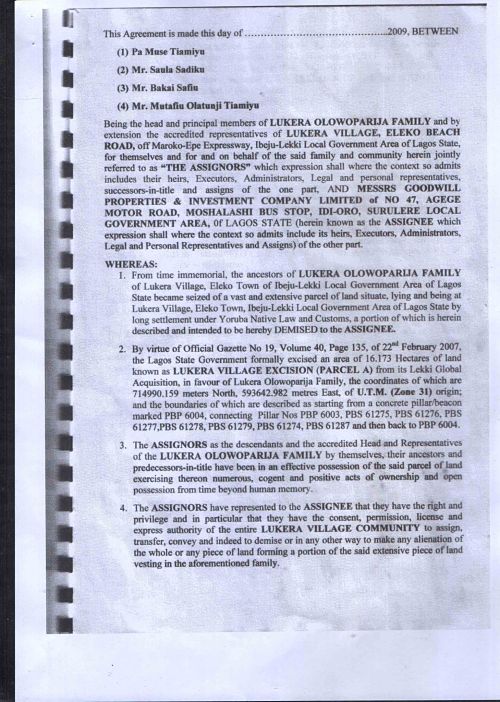
1. The Parties’ to the Agreement e.g between Mr A and Mrs K
2. The addresses of both parties and how it is binding on their successors, friends, colleagues and those representing them in any capacity.
3. The history of the land in question how it was first obtained down to the moment its about to be sold including and documents it previously had till this date
4. The agreed cost of the land and the willingness of the Seller to finally accept that price paid for the land
5. The description and size of the land to be transferred.
6. The covenants or promises both parties choose to undertake to perfect the transfer of the document
7. The signature of the parties to the Assignment and Witnesses to the Transaction
8. Finally the section for the Commissioner of Oaths or Governors Consent to sign and validate the agreement.
These are the important features of a Deed of Assignment and must be included in all Documents for it to be valid.
Don’t listen to any Omonile who tells you he doesn’t or the family doesn’t sign a deed of assignment and that it is only a receipt you need. He is only looking for a way to resell your land to another person and to use receipt as a ploy to prevent you from establishing true ownership of your land.
Always consult a property lawyer before you buy a land to help prepare a deed of assignment. It will be your greatest mistake if you don’t have one.
Below is a sample deed of assignment and how it looks so that you don’t fall victim of land swindlers
SAMPLE DEED OF ASSIGNMENT

The Cover of the Deed of Assignment must show the parties to the transaction and the description of the land sold

The first page of the Deed of Assignment must contain the parties to the transaction and the brief history of how the land became the Sellers property

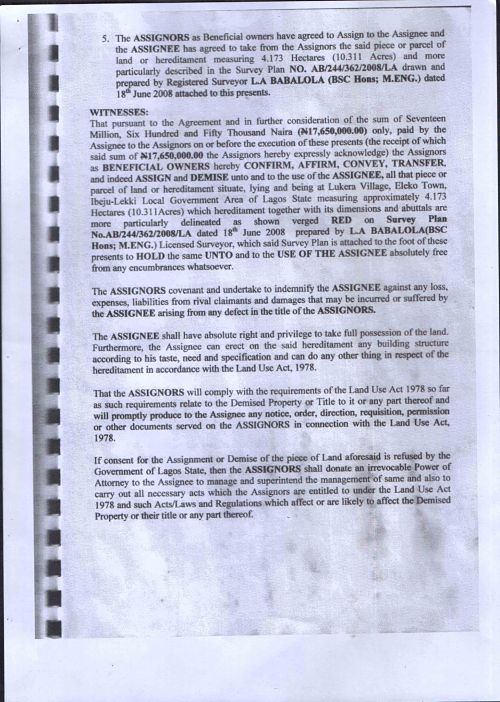
The third page must contain the description of the land to be sold, the surveyor that did it, the cost of the land, the acceptance of the cost of the land and the promises both parties will make to themselves to abide with after the deal has been sealed.

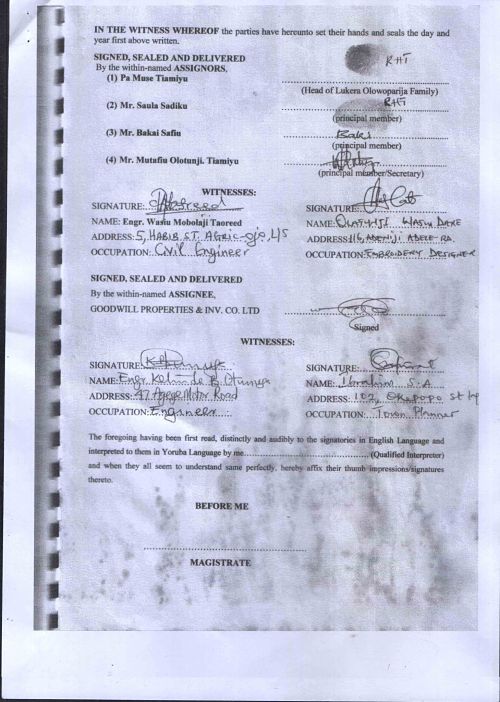
The last page must show the signatures of the parties and the witnesses to that transaction and finally below , the section for the commissioner of oaths to endorse or the Governor to assent his consent to this transaction
Always consult with a lawyer before entering a legal contract.
Borrowed From - Omonile Lawyers
I took my time to research more concerning deed of assignment, After much research i came across this from omonile lawyers, i bet you majority of land buyers today don't collect this documents after purchasing plot(s) of land.
A deed of Assignment is one of the most important documents YOU MUST HAVE when you conclude a Land Transaction. In fact it baffles me that 6 out of 10 people I know who have bought lands in the past have no deed of assignment. They are always the first to complain that Omonile has defrauded them but they have no proof to show the property has been sold to them other than a receipt.
It’s funny that everyone has the title documents to their car showing who the seller was and how it was transferred from the Seller of that car to you the new owner but when it comes to landed properties which are 10 times more valuable than cars, we fail to ask for this one simple important document that can prove ownership of that land. What then is this all important deed of Assignment I am alluding to? This can be found from the following definitions below:
A deed of Assignment is an Agreement between the Seller of a Land or Property and a Buyer of that Land or property showing evidence that the Seller has transferred all his rights, his title, his interest and ownership of that land to that the Seller that has just bought land.
The Deed of Assignment acts a main document between the buyer and seller to show proof of ownership in favour of the seller. The person or Seller who transfers his rights or interests in that property is usually called the Assignor and the person who receives such right or interest from the Seller is called the Assignee.
A Deed of Assignment therefore is an Agreement where an assignor states his promise that from the date of the assignment or any date stipulated therein, the assignor assigns his ownership in that Land to the assignee. The deed contains very pertinent information for a real estate transaction. For one, it spells out the date when the ownership of the property transfers from one owner to the other. The deed also gives a specific description of the property that is included in the transfer of ownership.
In most situations, when the Deed of Assignment has been exchanged between both parties, it has to be recorded in the land registry to show legal proof that the land has exchanged hands and the public should be aware of the transaction. Such recorded Deed of Assignment come in the form of either a Governor’s consent or registered conveyance. The Deed of Assignment spells out the key issues in the transaction between the Seller and the Buyer so that there won’t be any confusion or assumption after the property has been transferred to the new owner. Such Key issues include:

Signing a Deed of Assignment and having that Deed is your number 1 evidence against another person that is trying to claim ownership of that same land too. If you have a land and no deed yet, i feel sorry for you! Better consult your Lawyer to go draft one for you now to save yourself future problems
1. The Parties’ to the Agreement e.g between Mr A and Mrs K
2. The addresses of both parties and how it is binding on their successors, friends, colleagues and those representing them in any capacity.
3. The history of the land in question how it was first obtained down to the moment its about to be sold including and documents it previously had till this date
4. The agreed cost of the land and the willingness of the Seller to finally accept that price paid for the land
5. The description and size of the land to be transferred.
6. The covenants or promises both parties choose to undertake to perfect the transfer of the document
7. The signature of the parties to the Assignment and Witnesses to the Transaction
8. Finally the section for the Commissioner of Oaths or Governors Consent to sign and validate the agreement.
These are the important features of a Deed of Assignment and must be included in all Documents for it to be valid.
Don’t listen to any Omonile who tells you he doesn’t or the family doesn’t sign a deed of assignment and that it is only a receipt you need. He is only looking for a way to resell your land to another person and to use receipt as a ploy to prevent you from establishing true ownership of your land.
Always consult a property lawyer before you buy a land to help prepare a deed of assignment. It will be your greatest mistake if you don’t have one.
Below is a sample deed of assignment and how it looks so that you don’t fall victim of land swindlers
SAMPLE DEED OF ASSIGNMENT

The Cover of the Deed of Assignment must show the parties to the transaction and the description of the land sold

The first page of the Deed of Assignment must contain the parties to the transaction and the brief history of how the land became the Sellers property

The third page must contain the description of the land to be sold, the surveyor that did it, the cost of the land, the acceptance of the cost of the land and the promises both parties will make to themselves to abide with after the deal has been sealed.

The last page must show the signatures of the parties and the witnesses to that transaction and finally below , the section for the commissioner of oaths to endorse or the Governor to assent his consent to this transaction
Always consult with a lawyer before entering a legal contract.
Borrowed From - Omonile Lawyers


