Sunday, 11 November 2018

QUESTION: Explain grid levelling method

     Explain grid levelling method
 Image result for Explain grid levelling method

                     In this method, the area to be surveyed is divided into a grid or series of squares. The grid size may vary from 5 m x 5 m to 25 m x 25 m depending upon the nature of the terrain, the contour interval required and the scale of the map desired. 
Image result for Explain grid levelling method
Also, the grids may not be of the same size throughout but may vary depending upon the requirement and field conditions. The grid corners are marked on the ground and spot levels of these comers are determined by leveling. 
Image result for Explain grid levelling method
The grid is plotted to the scale of the map and the spot levels of the grid corners are entered. The contours of desired values are then located by interpolation. 
Image result for Explain grid levelling method
Special care should be taken to give the spot levels to the salient features of the ground such as hilltops, deepest points of the depressions, and their measurements from respective corners of the grids, for correct depiction of the features. The method is used for large scale mapping and at average precision. 

QUESTION: DESCRIBE THE SOURCES OF ERROR IN LEVELING


            DESCRIBE THE SOURCES OF ERROR IN LEVELING
Image result for reciprocal levelling

            Many sources of error exist in levelling and the most commonly met in practice are discussed. Firstly, one of the sources of error is errors in the equipment which is collimation error. This can be a serious source of error in levelling if the sight lengths from one instrument position are not equal, since the collimation error proportional to the difference in sight length. The line of collimation should be parallel to the line of sights. 
Image result for reciprocal levelling
Hence, in all types of levelling, sights should kept equal, particularly back sights and fore sights. Before using any level it is advisable to carry out a two-peg to ensure that the collimation error is as small as possible. Other than that, compensator not working. The function of compensator is to deviate the horizontal ray of light at the optical center of the object lens through the center of the cross hairs. This ensure that line of sight viewed through the telescope is horizontal.  
Image result for reciprocal levelling
If the reading changes to a different position each time the footscrew is moved or thr instrument tapped, the compensator is not working properly and the instrument should be returned to the manufacturer for repair. Parallax  also one of error in the equipment. Parallax must be eliminated before any readings are taken. Parallax is occur when the image of the distance point or object and focal plane are not fall exactly in the plane of the diaphragm. 
Image result for reciprocal levelling
To eliminate parallax, the eyepiece is first adjusted until the cross hairs appear in sharp focus. Then, defects on the staff  which is the incorrect graduation staff cause the zero error. This does not effect height differences if the same staff is used for all the levelling but introduces errors if to staves used for the same series of levels. When using a multisection staff, it is important to unsure that it is properly extended by examining the graduations on either side of each joint. The stability of tripods should also be checked before any fieldwork commences .
Image result for reciprocal levelling 
                     Secondly, field errors also source of error. The example of field errors is staff not vertical, failure to hold the staff vertical will result in incorrect readings. The staff is held vertical with the aid of a circular bubble. At frequent intervals the circular bubble should checked against plumb line and adjusted if necessary. Another example of field errors is unstable ground. When the instrument is set up on soft ground and bituminous surfaces on hot days, an effect often overlooked is that the tripod legs may sink into the ground or rise slightly while readings are being taken.This alters the height collimation and therefore advisable to choose firm ground on which to set up the level. 

After that, handling the instrument and tripod as well as vertical displacement, the HPC may be altered for any set-up if the tripod is held or leant against. When levelling, avoid contact with the tripod and only use the level by light contact through the fingertips. Then, instrument not level is also the field errors. For automatic levels this source of error is unusual but, for tilting level in which the tilting screw has to be adjusted for each reading, this is common mistake. The best solution is to ensure the main bubble is centralised before and after reading.
 Image result for reciprocal levelling
                 Thirdly, source of error is the effects of curvature and refraction on levelling. The effect of atmospheric on the line of sight is to bend it towards the Earth’s surface causing staff readings to be too low. This is variable effect depending on atmospheric condition but for ordinary work refraction is assumed to have value 1/7 that of curvature bit is of opposite sign. The combined and refraction correction is c + r = 0.0673 D². If longer sight lengths must be used, it is worth remembering that the effects of curvature and refraction will cancel if the sight length are equal. But, curvature and refraction cannot always be ignored when calculating heights using theodolite methods.
 Image result for reciprocal levelling
                  Lastly, source of error is reading and booking error and also weather conditions. Source of reading error is the sighting the staff over too long a distance, when it becomes impossible to take accurate readings. It is , therefore, recommended that sighting distances should be limited to 50m but, where absolutely unavoidable, this may be increased to maximum of 100m. For weather conditions, when it windy will cause the level to vibrate and give rise to difficulties in holding the staff steady. In hot weather, the effect of refraction are serious and produce a shimmering effect near ground level. The reading cannot be read accurately.


QUESTION : EXPLAIN BASIC RULES IN PRACTICE WHEN CONDUCTING A LEVELING


1.     EXPLAIN BASIC RULES IN PRACTICE WHEN CONDUCTING A LEVELING
    Image result for reciprocal levelling
                Levelling is the process of measuring the difference in elevation between two or more points. In engineering surveying, levelling has many application and is used at all stages in construction projects from the initial site survey through the final setting out. In practice, it is possible to measure heights to better than a few millimeters when levelling  this precision  is more than adequate for height measurement on the majority of civil engineering project.
Image result for reciprocal levelling
The basic rules in practice when conducting a levelling fieldwork should be adhered to if many of the sources of error are to be avoided. Levelling should always start and finish  at points of known reduced level so that misclosures can be detected. When only one bench mark is available, levelling lines must be run in loops starting and finishing at the bench mark. 
Image result for reciprocal levelling
Where possible, all sights length should below 50m. The staff must be held vertically by suitable use of a circular bubble or by rocking the staff and notong the minimum reading. Backsight and fortsight length should be equal for each instrument position. For engineering application, many intermediate sight readings may be taken from each set- up. Under this circumstances it is important that the level has no more than a small collimation error. 
Image result for reciprocal levelling
Reading should book immediately after they are observed and important readings, particularly at change points, should be checked. The rise and fall method of reduction should used when heighting reference or change  points and the HPR method ( height of collimation) should be used for contouring , sectioning and setting out applications.
Image result for reciprocal levelling

QUESTION: Describe the methods of inverted staff reading & reciprocal levelling


1       Describe the methods of inverted staff reading & reciprocal levelling
 Image result for reciprocal levelling
                       In levelling there are other levelling method which is inverted staff reading and reciprocal levelling. Inverted staff it may be necessary to determine the reduced levels of points such as the soffit of a bridge, underpass or canopy. Generally, these points will be above the line of collimation. To obtain the reduced levels of such points, the staff is held upside down in an inverted position with its base on the elevated points. When booking an inverted it is entered in the levelling table with a minus sign, the calculation proceeding in the normal way, taking this sign into account. An inverted staff position must not be used as a change point since there is often difficulty in keeping the staff vertical and in keeping its base in the same position for more than one reading. An inverted staff position must be used as a change point because it is often difficult to keep the staff vertical and to keep iys base in the same position for more than one reading.
Image result for reciprocal levelling
                           True differences in height are obtained by ensuring that back sight and fort sight lengths are equal when levelling. This eliminates the effect of any collimation error that may be present in the level used and also eliminates the effects of curvature and refraction. There are certain cases, however, when it may be not be possible to take readings with equal sight lengths as, for instance, when a line of levels has to be taken over a wide gap such as river. In these cases, the technique of reciprocal levelling can be adopted.
Image result for reciprocal levelling
                     Figure down shows two point A and B on opposite sides of a wide river. The line of collimation has been assumed to be elevated above the horizontal plane. This may not be the case but does not affect the calculations. To obtain the true difference in level between A and B a level is placed at I1 about 5m from A, and a staff is held vertically at A and B . Staff readings are taken at A (a1) and B (b1). The level is next taken to position I2 where readings a2 and b2 are recorded. Since the observations are taken over the same sighting distances with the same level, the effects of the collimation error will be the same for both cases. When repciprocal levelling with one level, the two sets of observations must follow each other as soon as possible so that refraction effects are the same and are therefore eliminated. Where this not possible, two levels have to be used simultaneously. It must be realised  that the levels should have the same collimation error or the true height different will not be obtained.


Image result for reciprocal levelling
2      

Sunday, 4 November 2018

Sunday, 28 October 2018

Ground Control - aerial photograph Ground Control

Ground Control - aerial photograph


Ground Control


Profile picture for user Haseeb Jamal
By: Haseeb Jamal SHALLOW

In order to produce an accurate map from aerial photograph it is absolutely necessary to established ground control. It consists in locating the positions of a no of pts. All over the area to be surveyed det their levels. These control pts short be such that can be easily identified on the photographs. Horizontal control is established by tiring or traversing. Vertical control is established through the use of ‘aneroid barometers’ or ‘Altimeters’

Applications of Air Photograph:

The practical uses of air photography are unlimited. Some of the application are listed below:
  • Town and country planning and developed estate man agent and economic planning are used both maps based on air survey and individual photography’s.
  • suitability of roads and rail alignments can be studied both for traffic flow an economy of construction.
  • Forestry and geology both use air maps and photography for the study of nature of areas and changes that take place.
  • Flood control planning can be based on air survey made at suitable intervals of time
  • Air survey provides means of mapping large undeveloped areas of the world.
  • For large scale engineering and redevelopment projects, reconnaissance can be undertake in to a large extend form air photograph.
  • Survey for accessing damage due to earth quake, crop dieses can be quickly estimated from air photograph.
  • Pollution effects form industrial wastes on land and water can be studied.

Tunnels:

Tunnels are constructed in order
  • To meet the req of rapid transportation in big cities.
  • To connect by shortest route, two termination separated by mountain.
  • To reduce very steep grades.
  • To avoid the excessive cost of mantaineice of an open cut subjected to land slides or snow drifts.
  • To avoid the expensive acquisition of valuable built up land, tearing up pavements and holding up traffic for long periods in large cities
  • When the depth of ordinary cutting exceeds 20m and the ground rises rapidly for a considerable distance after wards.

Chief considerations in location of a tunnel are

  • If should follow the best line adopted to the proposed traffic.
  • If should be most economical in construction an operation.
  • Convenience Ingress (enter) and Egress (leave)

Tunneling involves the following operatios:

  • Surface Survey
  • Transferring the alignment under ground
  • Transferring levels under ground

    SURFACE SURVERY:

This includes
  • A preliminary survey by transit and staid for 2-3miles (3-4km) on either side of the proposed alignment.
  • A plan (map) with a scale of say 1 in with contours drawn at 5m (20) intervals.
  • Final alignment is selected form this plan.
  • A detail survey of the geological information of strata as the cost of tunneling depends upon the nature of materials to be encountered.
The proposed route having been decided upon, the following pts require consideration.
  1. Alignment of the centre line of the tunnel.
  2. Gradient to be adopted.
  3. Determination of the exact length of tunnel.
  4. Establishment of permanent stations marking the line.
Control surveys for tunnel layouts are performed on ht surface joining the terminal pts of the tunnel is shown in figure (1).

Transferring the alignment under ground:

This is the most difficult and important operation in setting out a tunnel.
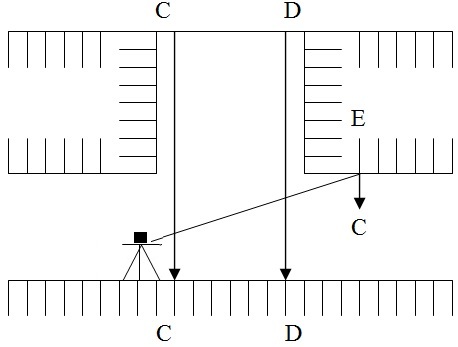
  • Fix two timber beams C and D as shown in figure two across the top of the shaft near its edges perpendicular to the direction of tunnel and as far apart as possible.
  • A threadlike is set up at a ground at a pre-determined station on a centre. Line mark one ground surface and another stations is again on the centre line itself.
  • The centre line is very carefully set up on the beams preferably on the plates fixed on a beam and drilled with hole for suspending wires by repetition observing and averaging the result.
  • From these pts two long penal wire with heavy plumb hobs 10 to 15 kg attacked to their lower edges or suspended down the shaft.
  • At the bottom these plumb bobs are immured in bucket of water, oil etc to eliminate oscillation.
  • Great care must be taken that wires and plumb bobs are hanging free. As a check the dist b/w the wires at the top and at the bottom of the shaft is to be measured and this should be the same.
  • The line joining the two wires gives the dir of alignment under ground.
  • The theodolite is transfer to the bottom of shaft and through the no of trails suspended wires.
  • Now the alignment is marked on marks driven into the whole i.e, E drilled on the roof.

Transferring levels under ground:

Leveling on the surface is done in the usual way and the levels are transfer underground at the ends of the tunnel from the nearest bench mark.
In case of transfer of levels underground at the shaft. The steps involve are
  • A fine steel wire loaded with weight of 5 to 15 kg is passed over a pulley (w) at the top of the shaft and is lowered into the shaft as shown in fig.3
  • Tow fine wire AA and BB horizontally stretched at the top and bottom of the shaft rasp.
  • The steel wired lowered into the shaft is so adjusted that it is in contact with both the wires AA and BB.
  • The pts of contact are marked on a still wire by a piece of chalk or by some other marker.
  • The wire is withdrawn form the shaft and is stretched on the ground.
  • The dist b/t the two marks on he wire is measured using the measuring tape and this gives the level of the bottom of the shaft.

LATTIUDE AND LONGITUDE:

O = Centre of earth
N = North Pole
S = South Pole
Nos = Polar axis or polar diameter about which earth rotates.
A = Any point on surface of earth
The position of a place on the earth surface is specified by latitude and longitude. The semi circle ‘NAS’ passing through A and terminates by the Poles N and S is called Meridian of the place.

LATITUDE:

Latitude of a place is the angular distance measured from the equator towards the nearer Pole along the meridian of the place or latitude of any pt ‘A’ is angle or arc AA’’. Latitude can also be defined as the angular distance that the place is north or south of equator.
The earth sphere being divided into two hemispheres by the equator, the upper one containing the North Pole is called the northern hemisphere. While the lower one having the South Pole is called southern hemisphere. The place is said to have a north latitude if it is in the northern hemisphere and south latitude if it is in the southern hemisphere.
The latitude angle is meared (90) at the earth center. North or south from the equatorial plane. Latitude north of equator is considered positive and that south of equator negative.

LONGITUDE:

Longitude of a place is the angular distance b/t the meridian of a place and the standard prime meridian
Or
Longitude of any place ‘A’ is angle ‘LA’ measured in the equatorial plane b/t the standard meridian and the meridian through A.
Or
The meridian NGS passing through Greenwich England has been adopted internationally as the standard meridian. This meridian divides the sphere into two hemispheres. The longitude is measured from “O” to 180 either towards east or west. The west longitude is considered as positive and the east as negative. Longitude angles are measured at the earth centre east or west from the plane of ‘O’ longitude which has been arbitrary placed through green witch England.
Hence the position of place ‘A’ is completely specified by the latitude and longitude. These two terms give unique location of any pt on the earth. This system of geographic co-ordinates is used in navigation and Geodesy.